

How to Create an Acrylic Pour Painting
Add a kaleidoscope of color to your next canvas with the Dirty Pour technique.
New to acrylic pour painting? This fun, easy fluid technique is perfect for beginners and younger artists. Learn everything you need to know, then try it out with our step-by-step guide.
What Is Acrylic Pour Painting?
- Straight Pour: Pouring paint colors one by one onto a surface for a drippy layered effect.
- Dirty Pour: Layering paint colors into a single, disposable cup, then pouring them onto the surface all at once for a marble-like effect.
-
Tree Ring Pour: Layering paint colors into a disposable cup, then pouring them onto the surface in a circular motion to create rings of color.
Which Paints Are Best for Acrylic Paint Pouring?
Fluid or soft body acrylic paints are the best choice for acrylic paint pouring. Some paints come ready to use, while others need to be mixed with a pouring medium or water to achieve the perfect consistency.
Which Surfaces Are Best for Acrylic Pour Painting?
You can practice acrylic pour painting on nearly any flat surface that’s been properly primed, including stretched canvas, wood panels, and canvas boards.
Acrylic Pour Painting: Dirty Pour Painting Technique
What You’ll Need
- artPOP! Soft Body Acrylics, Neon Colors
- artPOP! Stretched Canvas
- Wood Craft Sticks
- Disposable Cups, 8 Small and 1 Large
Optional:
- Plastic Comb
- Hair Dryer
- Spray Bottle with Rubbing Alcohol
Tips:
Cover your work surface with a large plastic sheet or some kraft paper before pouring to protect against drips and spills. If you don’t have disposable cups for the paint, old yogurt cups work great!
Step-by-Step Instructions

Step 1
Choose your paint colors and fill cups slightly less than half full. To get a good pouring consistency, dilute your paint with about 30% warm water and stir to mix.

Step 2
Pour a little of each color into a single, larger cup for a layered effect. Do not stir, as stirring will muddy the colors and eliminate the swirl effect.

Step 3
Pour the layered paint onto the center of your canvas.
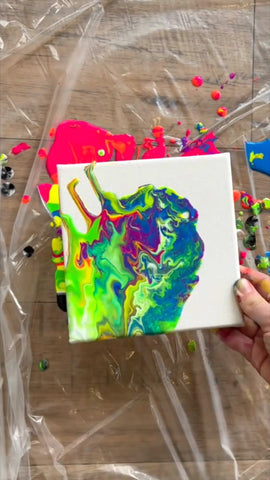
Step 4
Lift and tilt the canvas to swirl the paint around half of the surface.

Step 5
Fill another cup, using different colors or the same colors in a different order.

Step 6
Pour the paint over the remaining white space

Step 7
Lift and tilt the canvas until you’re happy with the pattern and coverage. If your painting looks too static, you can nudge the design by dragging a plastic comb across the canvas or using a hair dryer to carefully blow the colors around. Eliminate any bubbles in the paint with a spritz of rubbing alcohol. Expect your piece to take a solid day to dry.